
What to Do in the First 60 Minutes After a Pipe Bursts (Before Help Arrives)

A burst pipe is one of the most stressful plumbing emergencies anyone can face. One moment everything seems fine, and the next, water is spreading into your home. The first hour after discovering a burst pipe, often called the Golden Hour, is the most important. If you act quickly, you can reduce water damage, lower repair costs, and make the cleanup process much easier.
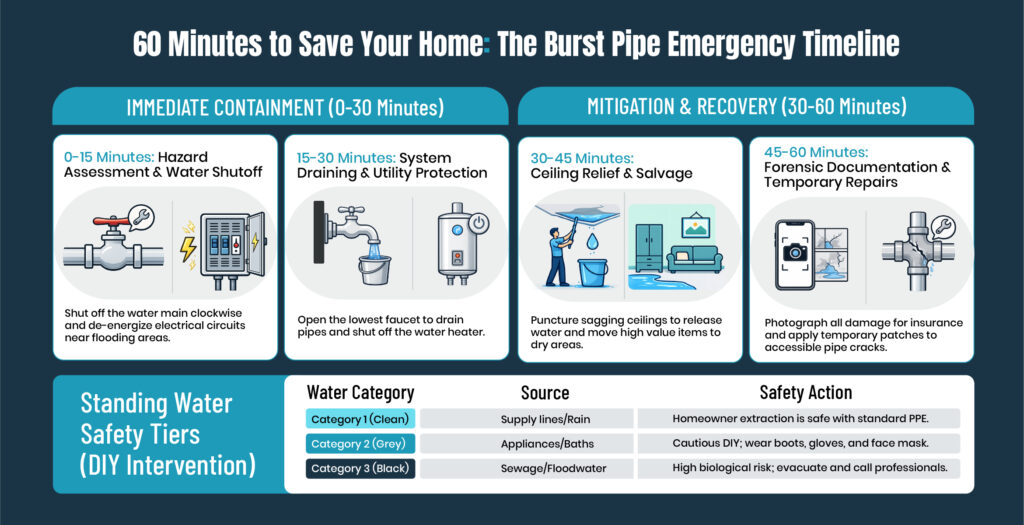
Phase 1: Minutes 0 to 15 – Safety and Isolation
1. Secure the Electricity and Gas
2. Shut Off the Main Water Supply
- Homes connected to a municipal water supply: The shutoff valve is usually near the water meter, often in the basement, garage, or utility room. In warmer climates, it may be inside a meter box near the street.
- Homes with a private well: The shutoff valve is generally located beside the pressure tank.
Turning off the main water supply is the fastest way to prevent more water from flowing through the damaged pipe.
Read more: Does Insurance Cover Water Damage? A Homeowner’s Guide
3. Identify the Type of Water
Water Category | Source | Risk Level | Required PPE |
Category 1: Clean | Burst supply lines, rainwater | Low biological risk | Boots, gloves, eyewear |
Category 2: Grey | Dishwashers, washing machines | Moderate chemicals or bacteria risk | Mask, goggles, heavy gloves |
Category 3: Black | Sewage, rising rivers | High biological/toxic risk | Complete suit; DO NOT TOUCH |
Wear waterproof gloves and boots whenever you’re working around standing water.
Phase 2: Minutes 15 to 30 – Drain the System and Protect Your Utilities
1. Drain the Plumbing System
2. Protect the Water Heater
If the plumbing system drains completely, your water heater could be damaged if it continues operating.
If the plumbing system loses all its water, turn off your water heater. Running it without water can cause damage.
- Electric water heaters: Turn off the breaker to protect the heating elements.
- Gas water heaters: Turn the control to Pilot or Off until the plumbing has been repaired.
3. Check for Frozen Pipes
Phase 3: Minutes 30 to 45 – Reduce Water Damage
1. Drain Water from Bulging Ceilings
In two-story homes, water often collects above drywall ceilings. If you notice a bulging or sagging area, place a large bucket underneath and carefully make a small hole in the lowest part of the bulge using a long screwdriver. This allows trapped water to drain into the bucket instead of causing the ceiling to collapse unexpectedly.
If the ceiling appears unstable or unsafe, stay away and wait for professional assistance.
2. Protect Your Belongings
Move electronics, important documents, rugs, and other valuable items to a dry area as quickly as possible. If large furniture cannot be moved, place wood blocks or aluminum foil under the legs to reduce moisture damage and prevent stains on the flooring.
3. Improve Air Circulation
- Open windows if the weather outside is dry.
- If the air is humid, keep the windows closed and use your air conditioner if it is safe to do so.
- Fans can also improve air circulation and speed up drying.
Phase 4: Minutes 45 to 60 – Document the Damage and Make Temporary Repairs
1. Document Everything
Before starting the cleanup, take clear photos and videos of:
- The burst pipe
- Standing water
- Damaged walls, ceilings, and flooring
- Furniture and personal belongings
- Any visible structural damage
2. Make a Temporary Repair
If the damaged section of pipe is easy to reach, a temporary repair may reduce the leak until a plumber arrives.
Some common temporary solutions include:
- Epoxy putty for small cracks or pinhole leaks.
- Pipe repair clamps with rubber gaskets for larger leaks.
- Push-to-connect fittings to temporarily seal or reconnect certain types of pipes.
First-Hour Checklist
- Turn off electricity if water is near electrical equipment.
- Shut off the main water supply.
- Drain the remaining water from the plumbing system.
- Turn off your water heater.
- Check for frozen pipes.
- Drain water from bulging ceilings if it is safe.
- Move valuable belongings to a dry location.
- Improve airflow to help dry the area.
- Take photos and videos for your insurance claim.
- Call a licensed emergency plumber.
The Bottom Line
Frequently Asked Questions
How can I prevent pipes from freezing in the winter?
Insulate exposed pipes, keep your home heated to at least 55°F, and let faucets drip during freezing temperatures.